Saturday, December 1, 2012

Https Url parsing Data

public static String[] getSongData(String url) {
        String[] mTitle = new String[2];
        try {
            DocumentBuilderFactory dbf = DocumentBuilderFactory.newInstance();
            DocumentBuilder db = dbf.newDocumentBuilder();
            Document doc = db.parse(OpenHttpsConnection(url));
            doc.getDocumentElement().normalize();
            NodeList nodeList = doc.getElementsByTagName("NowPlaying");
            for (int i = 0; i < nodeList.getLength(); i++) {
                Node node = nodeList.item(i);
                Element fstElmnt = (Element) node;
                NodeList nameList = fstElmnt.getElementsByTagName("Title");
                Element nameElement = (Element) nameList.item(0);
                nameList = nameElement.getChildNodes();
                mTitle[0] = ((Node) nameList.item(0)).getNodeValue();
                NodeList websiteList = fstElmnt.getElementsByTagName("Artist");
                Element websiteElement = (Element) websiteList.item(0);
                websiteList = websiteElement.getChildNodes();
                mTitle[1] = ((Node) websiteList.item(0)).getNodeValue();
            }

        } catch (Exception e) {
            e.printStackTrace();
        }
        return mTitle;
    }

    public static InputStream OpenHttpsConnection(String strURL)
            throws IOException, NoSuchAlgorithmException,
            KeyManagementException {
        InputStream inputStream = null;
        HttpsURLConnection.setDefaultHostnameVerifier(new HostnameVerifier() {
            public boolean verify(String hostname, SSLSession session) {
                return true;
            }
        });
        SSLContext context = SSLContext.getInstance("TLS");
        context.init(null, new X509TrustManager[] { new X509TrustManager() {
            public void checkClientTrusted(X509Certificate[] chain,
                    String authType) throws CertificateException {
            }

            public void checkServerTrusted(X509Certificate[] chain,
                    String authType) throws CertificateException {
            }

            public X509Certificate[] getAcceptedIssuers() {
                return new X509Certificate[0];
            }
        } }, new SecureRandom());
        HttpsURLConnection.setDefaultSSLSocketFactory(context
                .getSocketFactory());

        URL url = new URL(strURL);
        URLConnection conn = url.openConnection();
        try {
            HttpsURLConnection httpConn = (HttpsURLConnection) conn;
            httpConn.setRequestMethod("GET");
            httpConn.connect();
            if (httpConn.getResponseCode() == HttpsURLConnection.HTTP_OK) {
                inputStream = httpConn.getInputStream();
            }
        } catch (Exception ex) {
        }
        return inputStream;
    }

Send Data to Server throught JSON in Android

HttpRequest class :

import java.io.IOException;
import java.io.UnsupportedEncodingException;

import org.apache.http.HttpResponse;
import org.apache.http.client.methods.HttpGet;
import org.apache.http.client.methods.HttpPost;
import org.apache.http.client.params.ClientPNames;
import org.apache.http.client.params.CookiePolicy;
import org.apache.http.entity.StringEntity;
import org.apache.http.impl.client.DefaultHttpClient;
import org.apache.http.params.BasicHttpParams;
import org.apache.http.params.HttpConnectionParams;
import org.apache.http.params.HttpParams;
import org.apache.http.protocol.BasicHttpContext;
import org.apache.http.protocol.HttpContext;
import org.apache.http.util.EntityUtils;
import org.json.JSONObject;

import android.util.Log;

public class HttpRequest {

    DefaultHttpClient httpClient;
    HttpContext localContext;
    private String ret;

    HttpResponse response = null;
    HttpPost httpPost = null;
    HttpGet httpGet = null;

    public HttpRequest() {
       
        HttpParams myParams = new BasicHttpParams();
        HttpConnectionParams.setConnectionTimeout(myParams, 10000);
        HttpConnectionParams.setSoTimeout(myParams, 10000);
        httpClient = new DefaultHttpClient(myParams);
        localContext = new BasicHttpContext();
    }

    public void clearCookies() {
        httpClient.getCookieStore().clear();
    }

    public void abort() {
        try {
            if (httpClient != null) {
                System.out.println("Abort.");
                httpPost.abort();
            }
        } catch (Exception e) {
            System.out.println("abort" + e);
        }
    }

    public String sendPost(String url, String data) {
        return sendPost(url, data, null);
    }

    public String sendJSONPost(String url, JSONObject data) {
        return sendPost(url, data.toString(), "application/json");
    }

    public String sendPost(String url, String data, String contentType) {
        ret = null;

        httpClient.getParams().setParameter(ClientPNames.COOKIE_POLICY,
                CookiePolicy.RFC_2109);

        httpPost = new HttpPost(url);
        response = null;

        StringEntity tmp = null;

        httpPost.setHeader("User-Agent", "SET YOUR USER AGENT STRING HERE");
        httpPost
                .setHeader(
                        "Accept",
                        "text/html,application/xml,application/xhtml+xml,text/html;q=0.9,text/plain;q=0.8,image/png,*/*;q=0.5");

        if (contentType != null) {
            httpPost.setHeader("Content-Type", contentType);
        } else {
            httpPost.setHeader("Content-Type",
                    "application/x-www-form-urlencoded");
        }

        try {
            tmp = new StringEntity(data, "UTF-8");
        } catch (UnsupportedEncodingException e) {
            System.out.println("Encode Exception" + e);
        }

        httpPost.setEntity(tmp);

        try {
            response = httpClient.execute(httpPost, localContext);

            if (response != null) {
                ret = EntityUtils.toString(response.getEntity());
            }
        } catch (Exception e) {
            System.out.println("Error in sendPost" + e);
        }

        return ret;
    }

    public String sendGet(String url) {
        httpGet = new HttpGet(url);

        try {
            response = httpClient.execute(httpGet);
        } catch (Exception e) {
            Log.e("Your App Name Here", e.getMessage());
        }

        try {
            ret = EntityUtils.toString(response.getEntity());
        } catch (IOException e) {
            Log.e("Your App Name Here", e.getMessage());
        }

        return ret;
    }
}


JSON Data :

public JSONObject setJsonEmailMobile(Context c, String email, String mobile) {

        JSONObject jsData = new JSONObject();
        try {

            jsData.put("email", email);
            jsData.put("phone", mobile);
            Log.e("Json Data", "Json Data For Home is  : " + jsData.toString());

        } catch (Exception e) {
            // TODO: handle exception
            e.printStackTrace();
        }
        return jsData;
    }

 Main Activity:

public void httpRequestSend() {

        try {
            HttpRequest http = new HttpRequest();
            response = http.sendJSONPost(url, setJsonEmailMobile(this,
                    edtEmail.getText().toString(), edtMobile.getText()
                            .toString()));

        } catch (Exception e) {
            response = "";
        }

    }

Friday, November 9, 2012

Protect your code


A short tip to finish the day. Do you know that when you publish your Android Application it's so easy to download and decompile it?. So everyone can use your code or even modify it to break your copy protection or any thing else.
So it is very recommended to compress and obfuscate your code. It is very easy, simply add the following line in your /default.properties file:

proguard.config=proguard.cfg

And if you use the Eclipse option Export Signed Application Package create by hand the /proguard directory.
The only precaution is to add the following line in proguard.cfg for every class you don't want to be obfuscate:

-keep public class 

Why don't obfuscate? Very easy, if the class must be accessed dynamically in runtime you cannot obfuscate it, otherwise you'll get an Classnofound error.
I hope this trick will be useful for you.

Good practices for an Android beginner

When I begin to learn some new programming language or framework, I used to search for the good and bad practices I should take into account. In this old post (http://www.codingforandroid.com/2010/12/help-for-developers.html) I recommended you the Google Application Android Dev Helper 2010. In this app, the first entry in Android section is a little guide for beginners, with good an bad practices for Android developers. Here you have a little summary of the good practices:

About beauty:

About generosity:

About ubiquity:

About utility & entertaiment
  • Create an app that solves a problem
  • Present information in the most useful way possible
  • Create games that are ground breaking and compelling

About Epicness
  • Don't be satisfied with good
  • Create unique solutions
  • Invent new paradigms
  • Leverage the hardware

I hope this is of your interest.

Bad practices coding for Android

In the last post I talked about the good practices to follow by an android beginner. Now I'm going to summarize the bad practices collected from Android Dev Helper 2010. This are common mistakes we must avoid always when coding for Android. Google talks of them as "The five deadly sins":

About Sloth:

To avoid sloth we should be fast and responsive. The clues to be fast are the next:
  • Avoid creating objects (minimize it)
  • Use native methods
  • Virtual is better than interface
  • Static is better than virtual
  • Avoid internal getters an setters
  • Declare constants final
  • Avoid float an enums
  • Use package scope with inner classes

The clues for responsiveness are:
  • Avoid modal Dialogues and Activities, informing always the user with the progress and rendering and filling the data as it arrives
  • Respond to the user input within 5 seconds and Broadcast Receiver must complete in 10 seconds
  • Users perceive a lag longer than 100 to 200ms
  • Use Threads and AsyncTask within Services

About Gluttony:

We must use system resources responsabily:
  • Don't over use WakeLocks
  • Don't update Widgets too frequently
  • Don't update your location unnecessarily
  • Don't use Services to try to override users or the system
  • Do share data to minimize duplication
  • Do use Receivers and Alarms not Services and Threads
  • Do let users manage updates
  • Do minimize resource contention

For using Wakelocks correctly:
  • Do you really need to use one?
  • Use the minimum level possible
  • Release as soon as you can
  • Specify a timeout
  • Don't use them in Activities

About Hostility:

Avoid fight with your users. User experience should be your top priority and you should respect user expectations for navigating your app, avoiding hijack the native experience and respecting the user preferences:
  • The back button should always navigate back through previously seen screens
  • Always support trackball navigation
  • Understand your navigation flow when entry point is a notification or a widget
  • Navigating between application elements should be easy and intuitive
  • Don't hide the status bar
  • Use native icons consistently
  • Put menu options behind the menu button
  • Use only enabled location-based services
  • Ask permission before transmitting location data
  • Only transfer data in the background if user enabled

About Arrogance:
  • Avoid fight the system. Take it as it is.
  • Don't use undocumented APIs
  • Make your app behave consistently with the system
  • Respect the application lifecycle model

About Discrimination:

Since there are many devices and many SO versions, you should design and code for everyone.
  • Don't make assumptions about screen size or resolution
  • Never hard-code string values in code (or XML)
  • Use Relative Layouts and device independent pixels
  • Optimize assets for different screen resolutions
  • Use reflection to determine what APIs are available
  • Store values as Resources (colors, dimensions, arrays, images, layouts)

Canceling an AsyncTask using the back button

After the last post about AsyncTask, there is a pending task to complete the example. A task running in background must be canceled if the user demand it. Thus, this is a good practice promoted by Google. Applications must be responsives. As well as canceling a task, we are going to learn how to capture the back button. AsyncTask will be canceled when back button is pressed by the user.

For capturing back button since Android 2.0 (Api level 5), Google has implemented a new method inActivity class which must be overridden. This method is onBackPressed(). In earlier versions, back button is captured with method onKeyDown() and is identified checking if key received as parameter is KeyEvent.KEYCODE_BACK.

So, in ProgressBarExampleActivity class from the last post we need two changes:
  • Add onBackPressed() method.
  • Set ProgressBarAsyncTask class as member of the class to be cancelled fromonBackPressed() method.

import android.app.Activity;
import android.os.Bundle;
import android.util.Log;
import android.view.View;
import android.widget.Button;
import android.widget.EditText;
import android.widget.ProgressBar;

public class ProgressBarExampleActivity extends Activity {
 
   private static final String LOG_TAG = "PB_EXAMPLE";
   private EditText etNumSecondsM;
   private EditText etSecondsProgressedM;
 
   private Button bExitM;
   private Button bExecuteM;
   private ProgressBar pbDefaultM;
   private ProgressBarAsyncTask pbTaskM = null;
 
   /** Called when the activity is first created. */
   @Override
   public void onCreate(Bundle savedInstanceState) {
      super.onCreate(savedInstanceState);
      setContentView(R.layout.main);
      drawGUI();
   }

   /** Called when user press the back button */
   @Override
   public void onBackPressed()
   {
      Log.d(LOG_TAG, "Cancelling task");

      if( pbTaskM != null)
      {
         pbTaskM.cancel( false);
      }
   }
 
   public void drawGUI()
   {
      Log.d(LOG_TAG, "Creating Graphic Interface");
      setContentView(R.layout.main);
        
      //Text Editors
      etNumSecondsM = (EditText) findViewById(R.id.etNumSeconds);
      etSecondsProgressedM = (EditText) findViewById( R.id.etSecondProgressed);
        
      //Buttons
      bExecuteM = (Button) findViewById(R.id.bExecute); 
      bExitM = (Button) findViewById(R.id.bExit);
        
      //Progress Bar
      pbDefaultM = (ProgressBar) findViewById( R.id.pbDefault);    
        
      // When the execution button is pressed, the AsyncTask is created and
      // executed.
      bExecuteM.setOnClickListener(new View.OnClickListener() {
            public void onClick(View view) {
               pbTaskM = new ProgressBarAsyncTask( pbDefaultM, etSecondsProgressedM);
               pbTaskM.execute( new Integer( etNumSecondsM.getText().toString()));
            }
      });

      bExitM.setOnClickListener(new View.OnClickListener() {
         public void onClick(View view) {
             exit( RESULT_OK);
         }
      });  
    }
    
    public void exit( int theResult)
    {
       setResult( theResult);
       finish();
    }
}

In the ProgressBarAsyncTask class we have to do next things:

  • Override onCancelled() method for resetting controls as we did in onPostExecute()method, because it will not be called after the cancellation.
  • In doInBackground() method call to isCancelled() method at the end of every iteration, to check if the task has been canceled and exit the loop.

import android.os.AsyncTask;
import android.util.Log;
import android.view.View;
import android.widget.EditText;
import android.widget.ProgressBar;

/**
 * ProgressBarAsyncTask extends from AsyncTask class. It is a template that 
 * is defined as follows:
 * 
 *      AsyncTask< InitialTaskParamsType, ProgressType, ResultTaskType>      
 *      
 */
public class ProgressBarAsyncTask extends AsyncTask {

   private static final String LOG_TAG = "PB_ASYNC_TASK";
   private ProgressBar pbM;
   private EditText teSecondsProgressedM;
   
   /**
    * The parameters in the constructor of the class are the controls from the
    * main activity that we will update as the background work is progressing.
    *  
    * @param pb: the progress bar control.
    * @param secondProgressed: an edit text with the percentage of seconds 
    *                          progressed.
    */
    public ProgressBarAsyncTask(ProgressBar pb, EditText secondProgressed) {
      Log.d(LOG_TAG, "Constructor");
  
      pbM = pb;
      teSecondsProgressedM = secondProgressed;
    }

    /**
     * This method will be called before the execution of the task. Here we 
     * are activating the visibility of the progress controls of the main
     * activity.
     */
    @Override
    protected void onPreExecute() {
      Log.d(LOG_TAG, "Pre-Execute");

      super.onPreExecute();
      pbM.setVisibility( View.VISIBLE);
      teSecondsProgressedM.setVisibility( View.VISIBLE);
    }

    /**
     * This method will be called after the invocation of the 
     * publishProgress( progress) method in the background task. Here is where
     * we update the progress controls.
     * 
     * @param progress: the amount of progress of the background task
     */
    @Override
    protected void onProgressUpdate(Integer... progress) {
      Log.d(LOG_TAG, "Progress Update: " + progress[0].toString());

      super.onProgressUpdate( progress[0]);  
      pbM.setProgress( progress[0]);
      teSecondsProgressedM.setText( progress[0].toString());
    }
 
    /**
     * This method is called after the execution of the background task. Here
     * we reset the progress controls and set their visible property to 
     * invisible again, to hide them.
     * 
     * @param result: is the result of the background task, and it is passed to
     *                this method with de result returned in the 
     *                doInBackGroundMethod()
     */
    @Override
    protected void onPostExecute(Boolean result) {
       Log.d(LOG_TAG, "Post-Execute: " + result);
  
       super.onPostUpdate( result);
       pbM.setVisibility( View.INVISIBLE);
       teSecondsProgressedM.setVisibility( View.INVISIBLE);
       teSecondsProgressedM.setText("");
       pbM.setProgress(0);
    }

    /**
     * This method is called when the AsyncTask is canceled. When this method
     * is called, controls are reset to be used again. 
     */
    @Override
    protected void onCancelled(){
      Log.d(LOG_TAG, "onCancelled");
     
      super.onCancelled();   
      pbM.setVisibility( View.INVISIBLE);
      teSecondsProgressedM.setVisibility( View.INVISIBLE);
      teSecondsProgressedM.setText("");
      pbM.setProgress(0);
    }

    /**
     * This method is called for executing the background task in the AsyncTask.
     * For this tutorial we are only sleeping the thread for the number of 
     * seconds passed as parameter of the function.
     * 
     * @param numSeconds: life of the task
     * @return the result of the background task
     */
    @Override
    protected Boolean doInBackground(Integer... numSeconds) {
      Log.d(LOG_TAG, "doInBackground: " + numSeconds[0]);
  
      try {  
        int totalSecs = numSeconds[0].intValue();
        Log.d(LOG_TAG, "Total SECS: " + totalSecs);
   
        for (int i = 1; i <= totalSecs; i++) {
           Log.d(LOG_TAG, "Sleeping " + i);
           Thread.sleep(1000);
    
           float percentage = ((float)i / (float)totalSecs) * 100;
           Log.d(LOG_TAG, "Percentage of progress: " + percentage);
    
           publishProgress( new Float( percentage).intValue());
           if( isCancelled())
           {
              Log.d(LOG_TAG, "doInBackGround. Task cancelled");
              return false;
           }
        }  
      } catch (InterruptedException e) {
          e.printStackTrace();
          return false;
      }

      return true;
   }
}

Basic AsyncTask with a progress bar widget

After a few days far from this coding corner, today I'm going to show you an example with one important tool for executing tasks in background with Android. In earlier versions of Android, background execution of task was made managing threads and handlers, as you can see in this example. It was not difficult, but threads are always a thorny issue. Google has simplified this mechanism by means of AsyncTask class.

In this AsyncTask tutorial I have implemented a progress bar widget in the main activity. You can set the number of seconds the task will take. It's a very simple example. Let's go!!!!

First we will define the progress bar in the main.xml file, setting it as invisible in the visibility property:

<ProgressBar
    android:id="@+id/pbDefault"
    android:layout_width="fill_parent"
    android:layout_height="wrap_content"
    style="@android:style/Widget.ProgressBar.Horizontal"
    android:visibility="invisible"
 />

After that, we will define ProgressBarAsyncTask, which will be in charge of doing a background work and update its progress in the progress bar widget. Methods are explained with comments over the code:

import android.os.AsyncTask;
import android.util.Log;
import android.view.View;
import android.widget.EditText;
import android.widget.ProgressBar;

/**
 * ProgressBarAsyncTask extends from AsyncTask class. It is a template that 
 * is defined as follows:
 * 
 *      AsyncTask< InitialTaskParamsType, ProgressType, ResultTaskType>      
 *      
 */
public class ProgressBarAsyncTask extends AsyncTask {

   private static final String LOG_TAG = "PB_ASYNC_TASK";
   private ProgressBar pbM;
   private EditText teSecondsProgressedM;
   
   /**
    * The parameters in the constructor of the class are the controls from the
    * main activity that we will update as the background work is progressing.
    *  
    * @param pb: the progress bar control.
    * @param secondProgressed: an edit text with the percentage of seconds 
    *                          progressed.
    */
    public ProgressBarAsyncTask(ProgressBar pb, EditText secondProgressed) {
      Log.d(LOG_TAG, "Constructor");
  
      pbM = pb;
      teSecondsProgressedM = secondProgressed;
    }

    /**
     * This method will be called before the execution of the task. Here we 
     * are activating the visibility of the progress controls of the main
     * activity.
     */
    @Override
    protected void onPreExecute() {
      Log.d(LOG_TAG, "Pre-Execute");

      super.onPreExecute();
      pbM.setVisibility( View.VISIBLE);
      teSecondsProgressedM.setVisibility( View.VISIBLE);
    }

    /**
     * This method will be called after the invocation of the 
     * publishProgress( progress) method in the background task. Here is where
     * we update the progress controls.
     * 
     * @param progress: the amount of progress of the background task
     */
    @Override
    protected void onProgressUpdate(Integer... progress) {
      Log.d(LOG_TAG, "Progress Update: " + progress[0].toString());

      super.onProgressUpdate( progress[0]);  
      pbM.setProgress( progress[0]);
      teSecondsProgressedM.setText( progress[0].toString());
    }
 
    /**
     * This method is called after the execution of the background task. Here
     * we reset the progress controls and set their visible property to 
     * invisible again, to hide them.
     * 
     * @param result: is the result of the background task, and it is passed to
     *                this method with de result returned in the 
     *                doInBackGroundMethod()
     */
    @Override
    protected void onPostExecute(Boolean result) {
       Log.d(LOG_TAG, "Post-Execute: " + result);
  
       super.onPostUpdate( result);
       pbM.setVisibility( View.INVISIBLE);
       teSecondsProgressedM.setVisibility( View.INVISIBLE);
       teSecondsProgressedM.setText("");
       pbM.setProgress(0);
    }

    /**
     * This method is called for executing the background task in the AsyncTask.
     * For this tutorial we are only sleeping the thread for the number of 
     * seconds passed as parameter of the function.
     * 
     * @param numSeconds: life of the task
     * @return the result of the background task
     */
    @Override
    protected Boolean doInBackground(Integer... numSeconds) {
      Log.d(LOG_TAG, "doInBackground: " + numSeconds[0]);
  
      try {  
        int totalSecs = numSeconds[0].intValue();
        Log.d(LOG_TAG, "Total SECS: " + totalSecs);
   
        for (int i = 1; i <= totalSecs; i++) {
           Log.d(LOG_TAG, "Sleeping " + i);
           Thread.sleep(1000);
    
           float percentage = ((float)i / (float)totalSecs) * 100;
           Log.d(LOG_TAG, "Percentage of progress: " + percentage);
    
           publishProgress( new Float( percentage).intValue());
        }  
      } catch (InterruptedException e) {
          e.printStackTrace();
          return false;
      }

      return true;
   }
}
Now its the time for implementing the main activity: 
import android.app.Activity;
import android.os.Bundle;
import android.util.Log;
import android.view.View;
import android.widget.Button;
import android.widget.EditText;
import android.widget.ProgressBar;

public class ProgressBarExampleActivity extends Activity {
 
   private static final String LOG_TAG = "PB_EXAMPLE";
   private EditText etNumSecondsM;
   private EditText etSecondsProgressedM;
 
   private Button bExitM;
   private Button bExecuteM;
   private ProgressBar pbDefaultM;
    
   /** Called when the activity is first created. */
   @Override
   public void onCreate(Bundle savedInstanceState) {
     super.onCreate(savedInstanceState);
     setContentView(R.layout.main);
     drawGUI();
   }
    
   public void drawGUI()
   {
      Log.d(LOG_TAG, "Creating Graphic Interface");
      setContentView(R.layout.main);
        
      //Text Editors
      etNumSecondsM = (EditText) findViewById(R.id.etNumSeconds);
      etSecondsProgressedM = (EditText) findViewById( R.id.etSecondProgressed);
        
      //Buttons
      bExecuteM = (Button) findViewById(R.id.bExecute); 
      bExitM = (Button) findViewById(R.id.bExit);
        
      //Progress Bar
      pbDefaultM = (ProgressBar) findViewById( R.id.pbDefault);    
        
      // When the execution button is pressed, the AsyncTask is created and
      // executed.
      bExecuteM.setOnClickListener(new View.OnClickListener() {
         public void onClick(View view) {
            ProgressBarAsyncTask pbTask = new ProgressBarAsyncTask( pbDefaultM,
                                                                    etSecondsProgressedM);
            pbTask.execute( new Integer( etNumSecondsM.getText().toString()));
         }
      });

      bExitM.setOnClickListener(new View.OnClickListener() {
         public void onClick(View view) {
             exit( RESULT_OK);
         }
      });  
    }
    
    public void exit( int theResult)
    {
       setResult( theResult);
       finish();
    }
}
Here the clue is the creation of the ProgressBarAsyncTask and its execution with execute()method, when the "Show Progress Bar" button is pressed. I hope this example is interesting for you. I will return soon with a tutorial for canceling the AsyncTask. See you soon.

Adding a button to rate your app in the Market


When you publish an application on the Market is usually a great idea to encourge your users to rate it.
The percentage of users who rate applications is usually very low, so putting a button to facilitate the work is one of the best strategies to get a lot of rates.
And it's very simple, basically you must launch an Intent with a url to the market, and it does all the work alone.
public void rate(View view) {
  Intent intent = new Intent(Intent.ACTION_VIEW);
  intent.setData(Uri.parse("market://details?id=com.trackeen.sea"));
  startActivity(intent);
}
Obviously you must change the name for the package, to yours.
And for the button you must include something like this in the view:
And that's all.
Note: If you test launching the market in the Android emulator you will get the following error:

ERROR/AndroidRuntime(230): Caused by: android.content.ActivityNotFoundException: No Activity found to handle Intent { act=android.intent.action.VIEW dat=market://details?id=com.trackeen.sea }
Don't worry, the Market doesn't work in emulators, when you try this code in a real device it will work.

Leaked images expose the rumored Sony Xperia Yuga


Leaked images of the rumored Sony Xperia Yuga are making their way across the web today, highlighting the handset’s minimalism design that takes a few cues from the recently launched Xperia T. The Sony Xperia Yuga is said to be running a 1.5 Ghz quad-core processor (most likely a Qualcomm Snapdragon S4 Pro) with 2GB ... Read More »
sony-xperia-yugo

Android and its Fragmentation


Android has been making rapid strides into the Mobile market and has become a serious contender for the top 1 position in the mobile market (and is picking up on the tablet market quite quickly).

The fact that it was anopen platform allowing for lot of innovation and choice made the developer world and the mobile OEMs vouch for it and the inroads it madeinto the market was significant – significant enough for Apple to stand up, take note and even file a law suit J

However, this very fact is now slowly turning to be a bane for the Android platform, as it has led to a huge amount of fragmentation in the market. OpenSignalMaps has done a research in 195 countries and has come up with the graphic that clearly depicts the kind of fragmentation in Android devices.

Samsung has clearly take a lion share of the market followed by HTC, Sony Ericcson and Motorola. An interesting fact is that they have spotted 3997 distinct devices!

This very fact has brought down the euphoria around Android. Another study by Appcelerator and International Data Corporation (IDC) says:

The most significant finding in the Q2 2012 Developer Survey is Apple opening a dramatic 16% lead over Google’s Android as far as which OS will win in the enterprise marketplace, with 53.2% of developers saying iOS will win vs. 37.5% saying Android will win. This is a very significant change over only three quarters: in Q3 2011, developers viewed iOS and Android in a dead heat at 44% each.
The challenges of this fragmentation are around the varied screen sizes and the many OS versions which translate to the larger effort and investment into testing on the varied combinations to keep all customers happy.
A graphic that illustrates the varied resolutions:
and the number of device models:

The above statistics sound a bit unsettling around the fragmentation aspects of Android and would probably scare away developers from investing on this platform!
But in my opinion, this is no different from the fragmentation on PC (probably better than that) where the browsers, the CPU powers, the models etc. are varied and still we have lot of gaming apps that are developed for all of them.
Probably the good news is that Android right from the beginning is learning its lessons quickly and it introduced the concept of “fragments” to scale to varied screen sizes and designs.
Android is just going through the stabilization phase of a open platform and the good news from the same study by Appelerator and IDC says:
Android has arrested its decline in developer interest. After a noticeable erosion of developer interest over the last year, developers’ Android handset “very interested” levels stabilized in Q2 2012 compared to Q1 2012, and Android tablet “very interested” levels ticked up 2.9%.

So, in my opinion, Android with all its challenges is just grown over the hype cycle and is here to stay as a strong contender to other mobile OSes and would probably win the race. However, right from the beginning, developers have to keep these variations in mind and build apps that look as seamless as possible on multiple OSes.
And testers, if you are reading, here is your chance... A lot of opportunities around device coverage, OS version coverage, screen size coverage and so on.

New Google Play Developer Console Available to Everyone

We've been working on a new Google Play Developer Console, centered around how you make and publish apps, to create a foundation for the exciting features we have planned for the future. Earlier this year at Google I/O, we demoed the new version (video). Since then, we've been testing it out with tens of thousands of developers, reviewing their feedback and making adjustments. 

Today, we’re very happy to announce that all developers can now try the new Google Play Developer Console. At its core, the Developer Console is how you put your app in front of hundreds of millions of Android users around the world, and track how your app is doing. We hope that with a streamlined publishing flow, new language options, and new user ratings statistics, you’ll have better tools for delivering great Android apps that delight users.

Sleeker, faster, easier to navigate


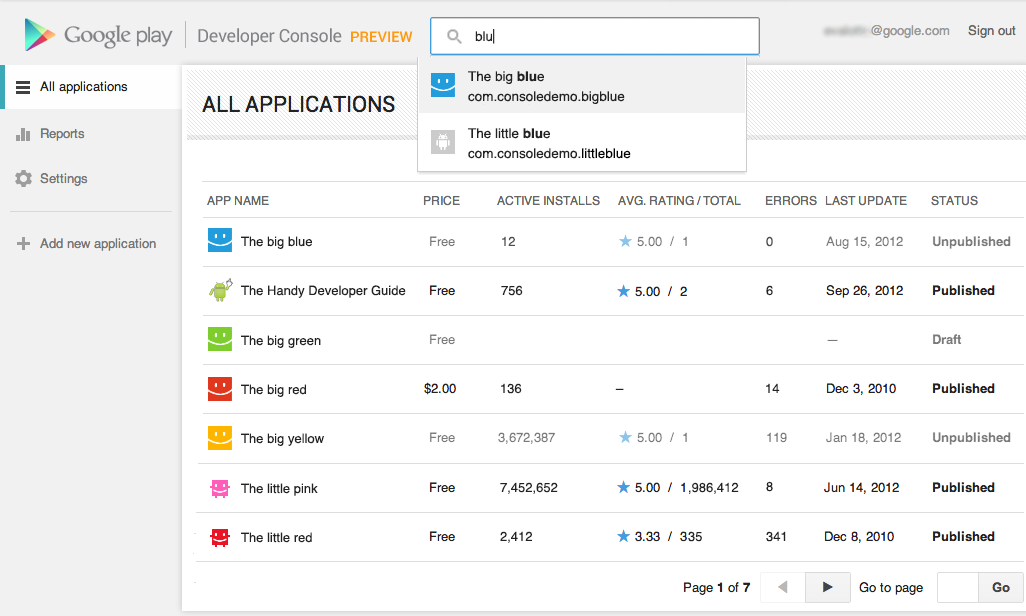
You spend a lot of time in the Developer Console, so we overhauled the interface for you. It's bright and appealing to look at, easy to find your way around using navigation and search, and it loads quickly even if you have a lot of apps. 

Designed for speed. Quickly locate the app data and business information you use every day. More screenshots »


Track user ratings over time, and find ways to improve


One of the most important things you'll be able to do is track the success of your app over time — it's how you continue to iterate and make beautiful, successful apps. You'll see new statistics about your user ratings: a graph showing changes over time, for both the all-time average user rating and new user ratings that come in on a certain day. As with other statistics, you'll be able to break down the data by device, country, language, carrier, Android version, and app version. For example, after optimizing your app for tablets, you could track your ratings on popular tablets.

New charts for user ratings. You can now track user ratings over time and across countries. More screenshots »


Better publishing workflow


We've completely revamped and streamlined the app publishing process to give you more time to build great apps. You can start with either an APK or an app name, and you can save before you have all of the information. You can also now see differences between the new and old versions of an app, making it easy to catch unintentional changes before you publish a new version to your users.

More languages for listings, with automated translations


You'll also enjoy a new app publishing flow and the ability to publish your app listing in 49 languages. Once you've saved any change to your application in the new Developer Console, your users will have the option of viewing an automatic translation of your listing on the web today and soon on devices — no additional action on your part is needed. 

How can you try the new version?


Go to your Developer Console and click on “Try the new version” in the header or go directly to the new version. If you prefer the new version, don't forget to bookmark the new URL. 

Please note that we're not quite done yet, so the following advanced features are not yet supported in the new Google Play Developer Console: multiple APK support, APK Expansion Files and announcements. To use these features, you can click “Switch back” in the header at any time to return to the old version.

Click the “Feedback” link in the header to let us know what you think, so that we can continue to improve your experience as a Google Play developer. Thank you for all of the feedback so far.